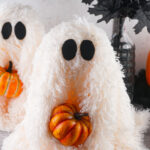
Viral Sherpa Ghost
These Viral Sherpa Ghosts have hit theinternet like a wave of bats leaving a cave! Why? Because they’re absolutelyadorable and insanely quick and simple to make. Plus, you can get most of thesupplies at the dollar store and end up with a finished product that doesn’tlook cheap!
Yield: 1
Equipment
- 1 6-Inch Styrofoam Cone
- 1 3.8” Styrofoam Ball
- 26” X 26” White Sherpa Material (or similar)
- 1 Fake Small Pumpkin (I used the largest pumpkins shown in the product link)
- (2) 1 ½ -Inch Black Felt Ovals
- 1 Glue Stick (for glue gun)
- Hot Glue Gun
Instructions
- Plugin your glue gun, insert a glue stick, and let it heat up.
- If you haven’t cut out your 1-inch black felt ovals for the eyes yet, do that now.
- Once you have everything out and ready to assemble, glue the styrofoam ball to the top of the cone. Make sure it’s centered. Press down on it gently for about 30 seconds to help it dry more securely. Give it a minute or so to dry fully.
- Evenly drape the piece of sherpa material over the top of the ball and cone. It should be hanging evenly on all sides. While adjusting the material, be careful to not yank around the styrofoam parts too hard. I do not normally secure the material in any way as it’s heavy enough not to move once it's been set and makes things easier for storage after the season is over.
- Make two folds in the material down both sides, but in the front of the ghost. These will act as hands to hold the pumpkin and don’t need to be glued in place. You’re just rearranging the fabric to position the pumpkin properly.
- Place the pumpkin in between the folds, like the ghost has hands and is holding the pumpkin. Once you’ve found how you like the pumpkin positioned, place glue on one side of the pumpkin at a time, and press it into the spot where you want the pumpkin to rest. Repeat with the other side of the pumpkin. Press the material against the pumpkin, where it’s glued, for at least 20-30 seconds.
- Place a dab of glue on the back of one black felt oval at a time and press the glued side onto the sherpa material, near the top middle of where the styrofoam ball sits. Repeat with the other eye. As you glue each eye, be sure to press and hold it for the first 20-30 seconds of drying.
- Position your ghost where you would like it displayed and enjoy!
Notes
● For storage, I place the styrofoam pieces into a storage tub with my other Halloween decor. For the sherpa material, I fold it neatly and place it in a baggie before laying it flat inside the storage tub. You want it to come out next year with no stains, wrinkles, etc.
● I have found sherpa throw blankets on sale that tend to make these even cheaper to make. However, most sherpa throws have two layers of material. The sherpa and then the back cover material. So, if you decide to cup up a blanket for this craft, you’ll either need to sew or glue the edges that aren’t closed. If you don’t really want to sew or glue that part (I don’t blame you) you can usually just face the already closed side of the blanket outward and leave that part in the back as you shouldn’t be able to tell otherwise, this way.
● There are sherpa car rags at the dollar store that are big enough for this craft. This seems to be the most popular route, but I didn’t like it very much. It looked ok in videos, but in person, it was underwhelming. This is my own personal opinion, but you might find you love it! So, this part is up to you on what route you take. You can get a cheap sherpa blanket and cut it up, just buy pre-cut material, get sherpa towels from the dollar store, etc. All of it works for this craft.
● I just cut my oval shapes out of those cheap 30-cent felt sheets from Walmart. Worked perfectly.
● Make sure the styrofoam cones you get have a flattened top and not pointed. If you already have one with a pointed top, you can simply use a kitchen knife to cut off the top tip for it to be flat.
● You can use a taller cone, but you’ll need longer material. Once you glue the ball to the top of the cone. Measure from the top middle of the ball to the bottom of the cone. Add an inch to that number, then double it, and that’s the square size you’ll want for your ghost.
● The width of your cone doesn’t really matter, just the height.
● You can use sticky felt eyes and stick them on like a sticker, if preferred. They held pretty well to the sherpa, but I don’t think they would make it through storage too many times. Just glue them back on if they ever decide to fall off.
● You can do a 24-inch square for the sherpa material, I just like it hanging a bit further down so the material is easier to position, which is why I went with a 26-inch square. The bigger square makes it look a bit more flowy looking too.
However, this part is up to you and your preferences.
● You can replace the pumpkin with other items such as a stirring spoon for a baker, a small stuffed animal for pet lovers, etc. Buying miniature hats, flowers, or bows is a fun way to change up your ghost’s look as well.